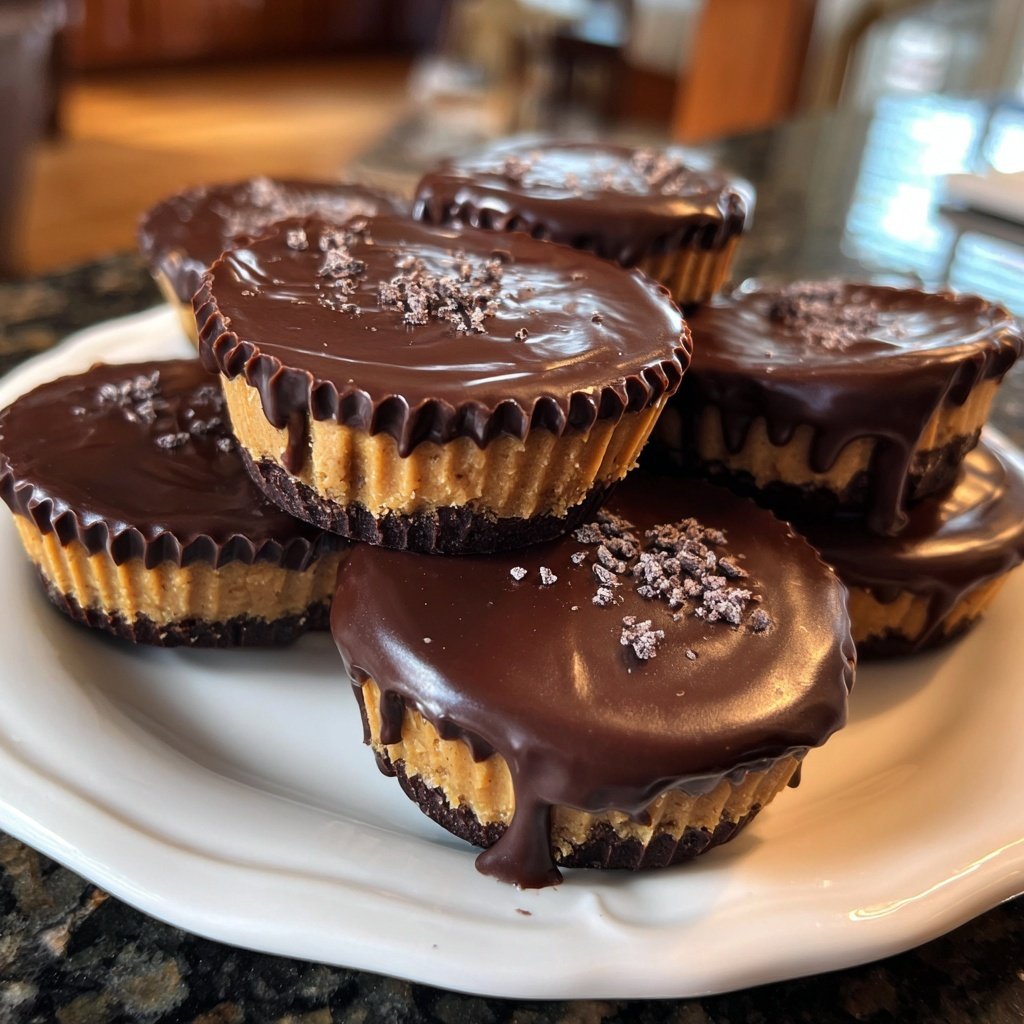
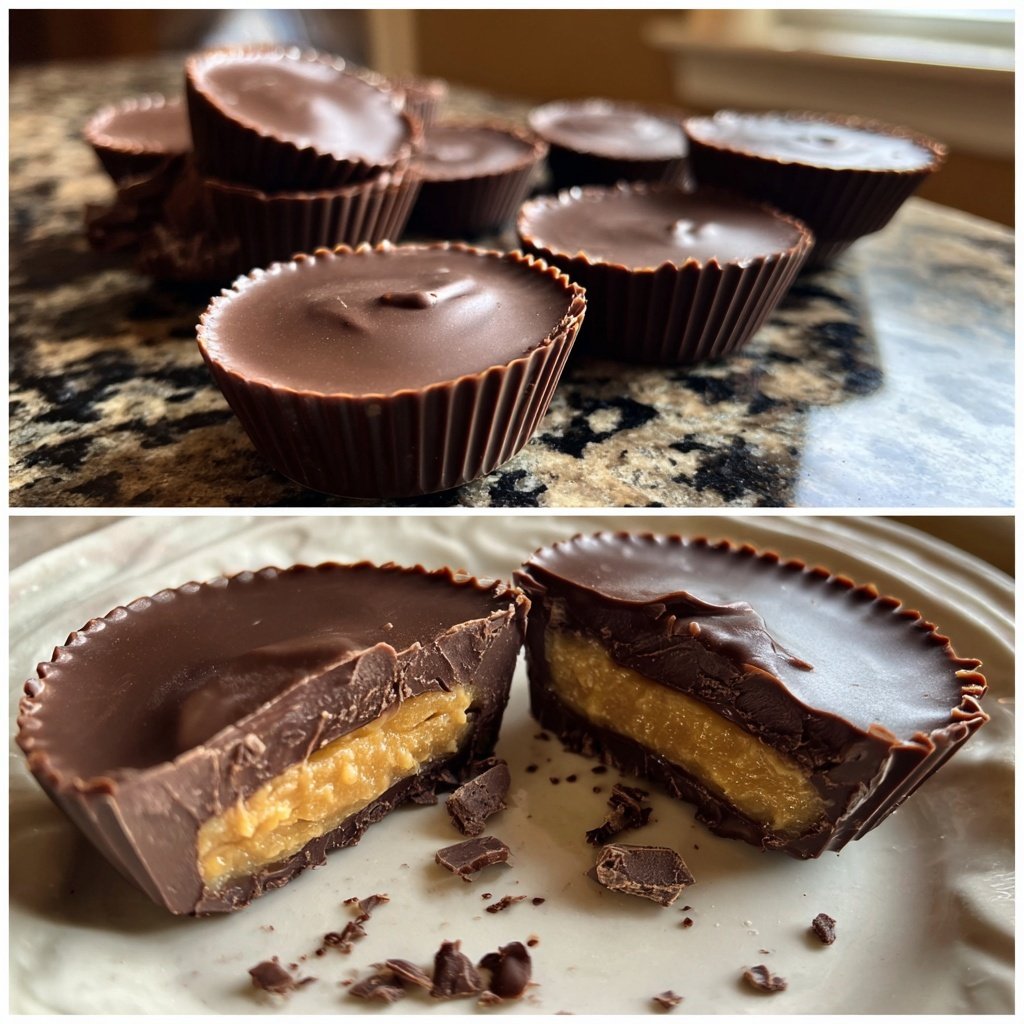
Homemade Reese’s Cups with Chocolate Shell
Highlighted under: Easy Desserts Collection
I’ve always loved the rich combination of chocolate and peanut butter, so making my own Reese’s Cups at home was a dream come true. This recipe elevates the classic taste with a smooth chocolate shell that’s so easy to make. You get to control the sweetness and texture to your liking, which is a game changer! Plus, they’re simple enough to whip up for a special treat or a cozy night in. Trust me, once you try these, you won’t want to go back to the store-bought version.
When I first attempted to make these Homemade Reese’s Cups, I was pleasantly surprised at how straightforward the process was. The secret to achieving that perfect chocolate shell is to temper the chocolate just right, which ensures it has a beautiful shine and a satisfying snap. I experimented with different types of chocolate, and I found that a mix of dark and milk chocolate offers the best balance for my taste buds.
During my trials, I learned that allowing the peanut butter filling to chill for a bit before assembling the cups really helps in maintaining their shape and prevents them from being too gooey. It’s these little tweaks that can take your homemade candy from good to incredible!
Why You'll Love This Recipe
- Rich chocolate flavor paired with creamy peanut butter
- Smooth texture that melts in your mouth
- Customizable sweetness to suit your tastes
Mastering the Chocolate Shell
Creating the perfect chocolate shell is essential for these Reese’s Cups. Using a double boiler helps evenly melt the chocolate chips. Ensure that the water does not touch the bottom of your bowl to prevent overheating and seizing the chocolate. Stir continuously until the mixture is glossy and smooth—it should take about 5-7 minutes on medium heat. If you’re short on time, a microwave can also work, but heat in short bursts of 20 seconds, stirring in between to achieve the same creamy consistency.
The addition of coconut oil is crucial here, as it gives the chocolate a beautiful sheen and adds to the rigidity of the shell. If you're aiming for a dairy-free option, look for dairy-free chocolate chips and coconut oil, which works beautifully as a substitute. The key is to keep the shell firm enough to hold the filling, so don’t be shy to use the right proportions of chocolate and oil.
Perfecting the Peanut Butter Filling
The peanut butter filling is where the magic happens, combining flavors and textures for that signature Reese’s experience. Use creamy peanut butter for a smooth component, but if you prefer a bit of crunch, a chunky version can also work. The key is to ensure your filling is well-balanced; the powdered sugar adds sweetness, while the salt enhances the overall flavor profile. If you like a touch of heat, consider adding a pinch of cayenne or cinnamon for depth.
For a sweeter bite, feel free to adjust the powdered sugar; however, do so gradually. Start with the recommended amount and then taste; it's easy to shift the sweetness, but difficult to fix a cloyingly sweet mixture. Make sure your filling is smooth to avoid any lumps, which can disrupt the overall texture of your cups. If you find your peanut butter too thick, a splash of milk can help achieve the desired consistency.
Ingredients
For the Chocolate Shell
- 2 cups semi-sweet chocolate chips
- 1 tablespoon coconut oil
For the Peanut Butter Filling
- 1 cup creamy peanut butter
- 1/2 cup powdered sugar
- 1/2 teaspoon salt
Instructions
Prepare the Chocolate Shell
Melt the chocolate chips and coconut oil in a double boiler over medium heat, stirring until smooth. Remove from heat and let cool slightly. Line a muffin tin with cupcake liners.
Form the Base
Spoon a layer of melted chocolate into the bottom of each liner, ensuring the sides are coated. Place in the freezer for 5 minutes to set.
Mix the Filling
In a bowl, combine the creamy peanut butter, powdered sugar, and salt until smooth. Remove the muffin tin from the freezer.
Add Peanut Butter Filling
Spoon a generous amount of the peanut butter mixture into each chocolate shell, filling to just below the top.
Top with Chocolate
Cover the peanut butter with more melted chocolate, using a spatula to smooth the tops. Return to the freezer for another 5-10 minutes to set completely.
Serve
Once set, remove the cups from the muffin tin. Peel off the liners, and enjoy your homemade Reese’s Cups!
Pro Tips
- For an extra twist, try using flavored chocolate or adding a sprinkle of sea salt on top before the chocolate sets. These cups make fantastic gifts wrapped in a cute box!
Storage and Shelf Life
These homemade Reese’s Cups store exceptionally well, making them a great treat to prepare in advance. After setting, keep them in an airtight container in the refrigerator, where they can last for up to two weeks. If you want to freeze them, arrange them on a baking sheet until solid, then transfer to a freezer-safe bag. They can stay frozen for up to three months. Just let them thaw in the fridge for a few hours before enjoying.
Make sure to separate layers with parchment paper to prevent sticking if you’re stacking them in a container. When serving, you can take them out of the fridge for a few minutes to slightly soften. This creates a delightful texture where you get the crispy shell and creamy filling at its best.
Variations to Try
After mastering the classic version, consider experimenting with flavors. For a twist, try using different nut butters like almond or cashew butter for an exciting change. You can also infuse the filling with vanilla extract or a hint of maple syrup for added complexity. If you're feeling adventurous, mix in pieces of crushed pretzels or toffee for a delightful crunch in the filling, creating a sweet-and-salty combination.
In addition, you can adapt the chocolate shell by incorporating flavored chocolate, like dark chocolate with sea salt or white chocolate drizzles for a more elegant touch. Drizzling with contrasting colors not only enhances flavor but also makes a beautiful presentation for gatherings!
Questions About Recipes
→ Can I use milk chocolate instead of semi-sweet?
Yes! Using milk chocolate will create a sweeter cup, which is a great option if you prefer less bitterness.
→ How should I store these cups?
Store them in an airtight container in the refrigerator for up to two weeks, or freeze for longer storage.
→ Can I substitute the peanut butter?
Absolutely! You can use almond or cashew butter for a different flavor profile.
→ What can I do if my chocolate isn't melting smoothly?
Make sure you're not overheating the chocolate. Use low heat and stir continuously to prevent scalding.
Homemade Reese’s Cups with Chocolate Shell
Created by: Prudence Whitby
Recipe Type: Easy Desserts Collection
Skill Level: Easy
Final Quantity: 12 cups
What You'll Need
For the Chocolate Shell
- 2 cups semi-sweet chocolate chips
- 1 tablespoon coconut oil
For the Peanut Butter Filling
- 1 cup creamy peanut butter
- 1/2 cup powdered sugar
- 1/2 teaspoon salt
How-To Steps
Melt the chocolate chips and coconut oil in a double boiler over medium heat, stirring until smooth. Remove from heat and let cool slightly. Line a muffin tin with cupcake liners.
Spoon a layer of melted chocolate into the bottom of each liner, ensuring the sides are coated. Place in the freezer for 5 minutes to set.
In a bowl, combine the creamy peanut butter, powdered sugar, and salt until smooth. Remove the muffin tin from the freezer.
Spoon a generous amount of the peanut butter mixture into each chocolate shell, filling to just below the top.
Cover the peanut butter with more melted chocolate, using a spatula to smooth the tops. Return to the freezer for another 5-10 minutes to set completely.
Once set, remove the cups from the muffin tin. Peel off the liners, and enjoy your homemade Reese’s Cups!
Extra Tips
- For an extra twist, try using flavored chocolate or adding a sprinkle of sea salt on top before the chocolate sets. These cups make fantastic gifts wrapped in a cute box!
Nutritional Breakdown (Per Serving)
- Calories: 380 kcal
- Total Fat: 26g
- Saturated Fat: 15g
- Cholesterol: 195mg
- Sodium: 85mg
- Total Carbohydrates: 32g
- Dietary Fiber: 3g
- Sugars: 24g
- Protein: 6g